
We recently completed a little renovation of our main level powder room. We did not have in mind to remodel the room. It just ended up happening unexpectedly. I had purchased a beautiful chandelier for our front living area but when we hung the light fixture, it was just too small for the space. I decided to find another location for the fixture and ultimately decided that it would look great in our powder bath. It did, and as it usually happens in our house, once we changed out one element, we ended up wanting to update the rest of the space as well. We call it the "If you give a mouse a cookie" phenomenon based on the book of the same name by Laura Numeroff. Basically once the mouse has a cookie, he then wants a glass of milk to go with it and then a napkin and so on and so forth. You get the idea. Well, this is exactly what happened with our bathroom situation.
Installing the light fixture involved pulling wires through the ceiling. For this I enlisted the help of my handy husband. Once the wires were pulled through, the sheet-rock had to be patched and sanded smooth. This necessitated painting the room. I had gone through a faux paint stage about ten years ago and I was more than happy to update that outdated paint job.


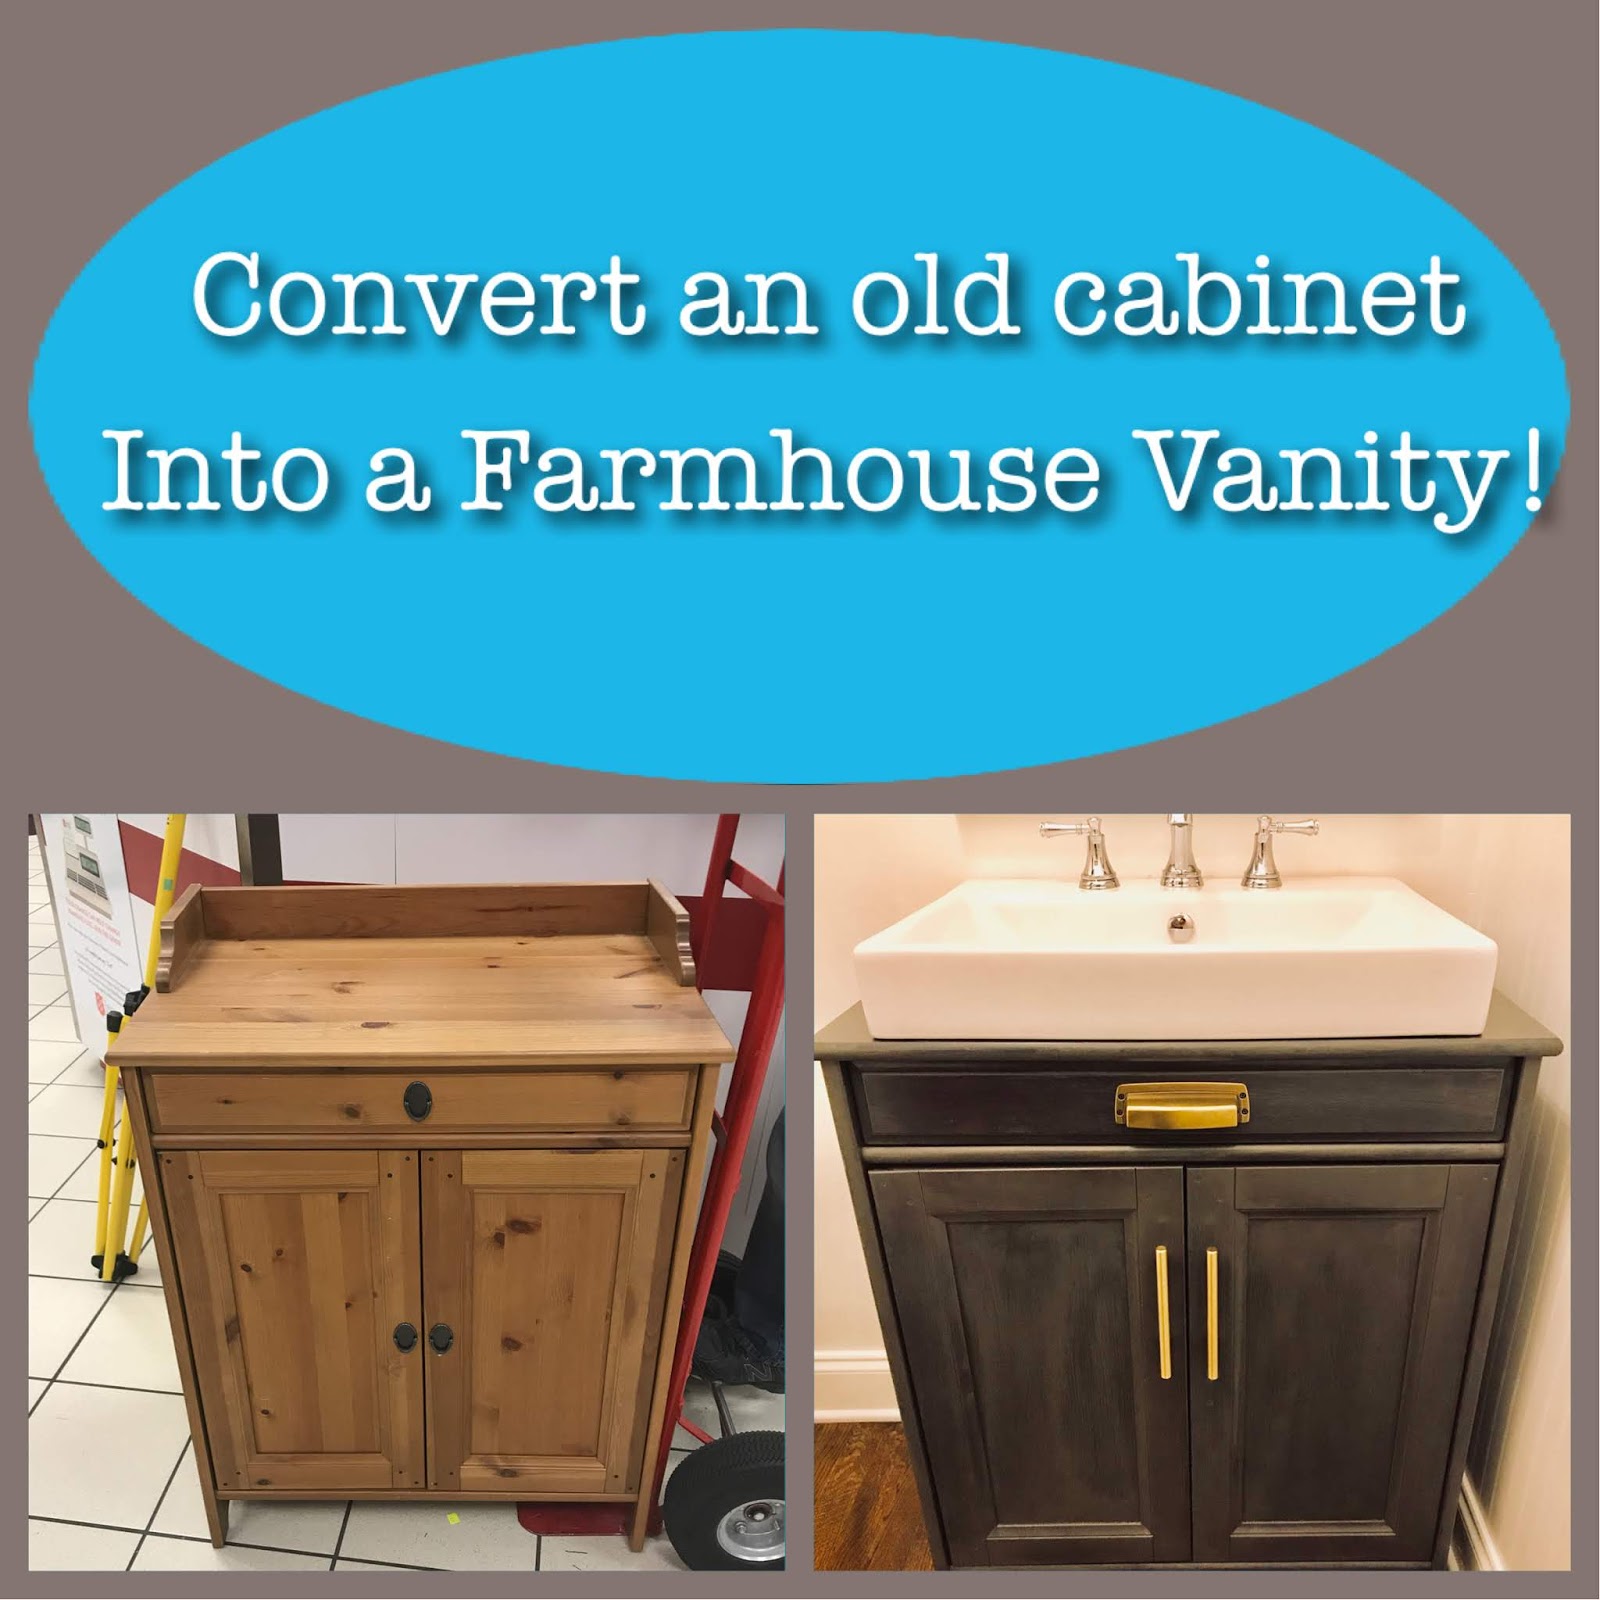
Once the room was painted, I decided that the vanity could use some updating as well. After scouring dozens of retailers, I could not find exactly the kind of vanity that I was looking for. I wanted a mixture of farmhouse with a little glam thrown in. Basically I wanted to find something that looked like it came from Restoration Hardware without the price tag. Then I got a really crazy idea to do a Chip and Joanna Gaines kind of project and make one ourselves. Since my hubby already has about a dozen projects on his Honey-Do list courtesy of moi, we decided to see if we could find an existing cabinet that would serve our purpose. We found this little beauty at a local thrift store for $59 and determined that it would suit our needs perfectly.

Hubby set about removing the wood ledge and cutting a hole for the farmhouse sink that we purchased for the top of the vanity. The sink came with a template to do just that which made the process fairly simple. He also had to remove the back of the cabinet so that he could attach the plumbing after it was installed. We removed the hardware and began converting this cute little cabinet into a contemporary farmhouse vanity.


The color of the cabinet was not exactly what I had envisioned so I decided to stain it with some gel stain by General Finishes. I gave the cabinet one coat with the color Java and let it dry for about 24 hours. Gel stain is very easy to work with and General Finishes offers lots of great video tutorials on their website. They also have a great Pinterest page where they share projects that have been completed using their products. Hopefully this project may end up there someday.


I applied a second coat of General Finishes Gel stain in the color Gray. I applied the Java in more of a solid fashion but after I applied the gray, I carefully wiped some of it off to get the wood more of a distressed look. Basically the gray stain was being applied as more of a glaze. I was going for a weathered gray look. General Finishes gel stain is a great product to use when you have a finished and sealed piece of furniture that is resistant to regular stains like this one was. I originally tried some Min-wax regular stain on this cabinet but it just would not penetrate the finish that it had already been sealed with. I then tried the gel stain and it worked like a charm. Be sure to use thick gloves when using gel stain because it eats through latex gloves rather quickly. It's also quite hard to remove from your skin so gloves are really a necessity.


Once the cabinet was dry, we dressed it up with some new hardware. I really had a hard time deciding on what type of hardware to use. I considered nickel and chrome but ultimately settled on euro bars and a cup pull in a beautiful satin brass. I love the fact that it is totally different than the faucet. I think mixing metals can be far more attractive and interesting than making everything matchy-matchy.


It's really hard to photograph the room as a whole because it's not a very large space but hopefully you can get an idea. We are really pleased with how it all turned out and credit to my hubby for being handed this project rather suddenly. We are a great team and whenever I get a vision for a remodel or DIY project, my hubby jumps on board and executes whatever needs to be done to see that vision to fruition. Thanks babe! Now on to the next project!!


No comments:
Post a Comment