I picked up the shades at Home Depot. If my memory serves me correctly they cost around $3.99 a piece. So along with the shades, you need some spray adhesive; I used Elmer's Spray Adhesive that I picked up at Joann's. You will also need some trim and a hot glue gun and of course, the fabric that you plan to use to cover the shades with.
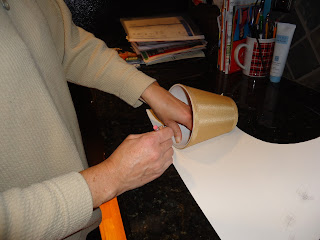
The first thing you need to do is make a template of your shade which you will use to cut out the fabric. To do this, place the lampshade on it's side and trace with a pencil as you roll the shade all the way around. It sounds confusing but once you put pencil to paper with shade in hand, it will all come together. You will need to trace both ends of the shade and once you do, you will end up with a template that looks somewhat like a skirt. Cut the template out and wrap it around your shade to see if the size matches. Make any adjustments as necessary.
Next pin the template to the fabric that you are using and cut out as many pieces as you need. You can easily cut out two at a time if you fold the fabric over. Now wrap the fabric around the shade and make any adjustments as necessary. I ironed a half inch seam on only one end of the shade fabric and tucked the other end underneath.
Next spray the shade with spray adhesive and attach the fabric to the shade. Carefully smooth out any creases and be sure to place the unseamed edge underneath the seamed edge. I was so pleased with how the Elmer's Spray Adhesive worked. It is now my new best friend as I can think of a hundred other uses for it! After you have attached the fabric to the shade, you are ready to add your trim. You can get as decorative as you like here by adding a beaded or feathery trim or you can just go with a basic trim like I did. I glued the trim with Aileens craft glue.
A few days later during a visit to Joann's, I discovered that there exists an adhesive trim that was virtually identical to the black trim that I used. Just peel and stick baby! I think it was actually less expensive as well than purchasing trim by the yard at the cutting counter. Especially if you use a coupon. I will definitely go that route in the future if I decide to make shades that require black trim. You are more limited with trim options that way but it is much easier!
I also discovered adhesive shades where you can peel off a paper layer and instantly attach the fabric of your choice. I wouldn't recommend those however because they cost about $9.99 for each shade. I only paid $3.99 for each shade so it was much more economical even with a can of Elmer's Fabric Adhesive which was about five dollars. I can't remember exactly how much it was but I know I used a 40% off coupon and those are readily available if you sign up to be on Joann's mailing list. Next time I post, I will try to do a better job of documenting exactly how much everything cost.
I am new at this instructional blogging so please go easy on me!
Ta-da! Here is the final product! Loved making these and my sister was kind enough to send me a picture of how they look in my Mom's new kitchen.
Looking back if you are using a pattered fabric, make sure the fabric is the same orientation on all the shades. You probably didn't notice this till I pointed it out but I actually cut most of the shades horizontally and inadvertently cut the last one out diagonally. I didn't notice the difference until they were all finished. Just wanted to spare you from that frustration! Still, all in all I think they look great and they go perfectly with the valance that I made in the background!
Love projects that are affordable, relatively easy yet have a big Wow factor! Hope you enjoyed the tutorial and have fun shade covering!


No comments:
Post a Comment